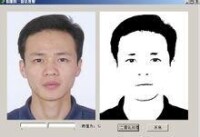
圖像二值化
圖像二值化
圖像二值化就是將圖像上的像素點的灰度值設置為0或255,也就是將整個圖像呈現出明顯的黑白效果。
OpenCV中有兩個函數可以實現圖片的二值化:
(1)cvThreshold( dst, dst,230 , 255, CV_THRESH_BINARY_INV);
(2)cvAdaptiveThreshold( dst, dst, 255, CV_ADAPTIVE_THRESH_MEAN_C,CV_THRESH_BINARY, 9, -10);
threshold_type=CV_THRESH_BINARY:
dst(x,y) = max_value, if src(x,y)>threshold 0, otherwise.
threshold_type=CV_THRESH_BINARY_INV:
dst(x,y) = 0, if src(x,y)>threshold; dst(x,y) = max_value, otherwise.
threshold_type=CV_THRESH_TRUNC:
dst(x,y) = threshold, if src(x,y)>threshold; dst(x,y) = src(x,y), otherwise.
threshold_type=CV_THRESH_TOZERO:
dst(x,y) = src(x,y), if (x,y)>threshold ; dst(x,y) = 0, otherwise.
threshold_type=CV_THRESH_TOZERO_INV:
dst(x,y) = 0, if src(x,y)>threshold ; dst(x,y) = src(x,y), otherwise.
值得一說的是threshold_type可以使用CV_THRESH_otsu類型,這樣該函數就會使用大律法OTSU得到的全局自適應閾值來進行二值化圖片,而參數中的threshold不再起 作用。比如:cvThreshold( dst, dst,300 , 255, CV_THRESH_OTSU | CV_THRESH_BINARY_INV);這種方法對於灰度直方圖呈現二峰特徵的圖片處理起來效果很好。
方法(2)是一個自適應閾值二值化方法,通過設定最後兩個參數來調整效果。
圖像的二值化的基本原理
圖像的二值化處理就是將圖像上的點的灰度置為0或255,也就是將整個圖像呈現出明顯的黑白效果。即將256個亮度等級的灰度圖像通過適當的閾值選取而獲得仍然可以反映圖像整體和局部特徵的二值化圖像。在數字圖像處理中,二值圖像佔有非常重要的地位,特別是在實用的圖像處理中,以二值圖像處理實現而構成的系統是很多的,要進行二值圖像的處理與分析,首先要把灰度圖像二值化,得到二值化圖像,這樣子有利於在對圖像做進一步處理時,圖像的集合性質只與像素值為0或255的點的位置有關,不再涉及像素的多級值,使處理變得簡單,而且數據的處理和壓縮量小。為了得到理想的二值圖像,一般採用封閉、連通的邊界定義不交疊的區域。所有灰度大於或等於閾值的像素被判定為屬於特定物體,其灰度值為255表示,否則這些像素點被排除在物體區域以外,灰度值為0,表示背景或者例外的物體區域。如果某特定物體在內部有均勻一致的灰度值,並且其處在一個具有其他等級灰度值的均勻背景下,使用閾值法就可以得到比較的分割效果。如果物體同背景的差別表現不在灰度值上(比如紋理不同),可以將這個差別特徵轉換為灰度的差別,然後利用閾值選取技術來分割該圖像。動態調節閾值實現圖像的二值化可動態觀察其分割圖像的具體結果。
通過Delphi刻度控制項調整閾值,實現動態控制,程序如下:
procedure TForm1.Button1Click(Sender: TObject);
var
p:PByteArray;
Gray,x,y:integer;
begin
TestBMP:=TBitmap.Create; changedbmp:=tbitmap.Create;
testbmp.Assign(image1.Picture);
for y:=0 to testbmp.Height-1 do
begin
p:=testbmp.ScanLine[y];
for x:=0 to testbmp.Width-1 do
begin
//首先將圖像灰度化
gray:=round(p[x*3+2]*0.3+p[x*3+1]*0.59+p[x*3]*0.11);
if gray> TrackBar1.Position then//按閾值進行二值化
begin
p[x*3]:=255; p[x*3+1]:=255; p[x*3+2]:=255;
end
else
begin
p[x*3]:=0;p[x*3+1]:=0;p[x*3+2]:=0;
end;
end;
end;
ChangedBmp.Assign(TestBMP);
PaintBox1.Canvas.CopyMode:=srccopy;
PaintBox1.Canvas.Draw(0,0,ChangedBmp);
end;

圖像二值化效果對比
OTSU的中心思想是閾值T應使目標與背景兩類的類間方差最大。
//用類間方差最大思想計算閾值
int Threshold(int *hist) //compute the threshold
{
float u0, u1;
float w0, w1;
int count0;
int t, maxT;
float devi, maxDevi = 0; //方差及最大方差
int i;
int sum = 0;
for (i = 0; i < 256; i++)
{
sum = sum + hist[i];
}
for (t = 0; t < 255; t++)
{
u0 = 0; count0 = 0;
//閾值為t時,c0組的均值及產生的概率
for (i = 0; i <= t; i++)
{
u0 += i * hist[i]; count0 += hist[i];
}
u0 = u0 / count0; w0 = (float)count0/sum;
//閾值為t時,c1組的均值及產生的概率
u1 = 0;
for (i = t + 1; i < 256; i++)
{
u1 += i * hist[i];
}
u1 = u1 / (sum - count0); w1 = 1 - w0;
//兩類間方差
devi = w0 * w1 * (u1 - u0) * (u1 - u0);
//記錄最大的方差及最佳位置
if (devi > maxDevi)
{
maxDevi = devi;
maxT = t;
}
}
return maxT;
}
//二值化處理
void OTSU(IplImage *src, IplImage *dst)
{
int i = 0, j = 0;
int wide = src->widthStep;
int high = src->height;
int hist = {0};
int t;
unsigned char *p, *q;
for (j = 0; j < high; j ++)
{
p = (unsigned char *)(src->imageData + j * wide);
for (i = 0; i < wide; i++)
{
hist[p[i]]++; //統計直方圖
}
}
t = Threshold(hist);
for (j = 0; j < high; j ++)
{
q = (unsigned char *)(dst->imageData + j * wide);
p = (unsigned char *)(src->imageData + j * wide);
for (i = 0; i < wide; i++)
{
q[i] = p[i] >= t ? 255 : 0;
}
}
}
OTSU演演算法對不均勻光照的圖片不能產生很好的效果。
另外一個Kittler演演算法,是一種快速的全局閾值法。它的效果不比OTSU差多少,但速度快好多倍,如果可以應用在圖像質量不錯的環境。
它的中心思想是,計算整幅圖像的梯度灰度的平均值,以此平均值做為閾值。
//kittler演演算法
for (i=1;i
{
plineadd=src->imageData+i*wide;
pNextLine=src->imageData+(i+1)*wide;
pPreLine=src->imageData+(i-1)*wide;
for(j=1;j
{
//求水平或垂直方向的最大梯度
Grads=MAX(abs((uchar)pPreLine[j]-(uchar)pNextLine[j]),abs((uchar)plineadd[j-1]-(uchar)plineadd[j+1])); //max(xGrads,yGrads)
sumGrads += Grads;
//梯度與當前點灰度的積
sumGrayGrads += Grads*((uchar)plineadd[j]);
}
}
threshold=sumGrayGrads/sumGrads;
// printf("%d\n",threshold);
for(i=0;i
{
plineadd=src->imageData+i*wide;
pTempLine=kittler->imageData+i*wide;
for(j=0;j
{
pTempLine[j]=(uchar)plineadd[j]>threshold?255:0;
}
}